Mojave Sonoran Trail: A 625 Mile Thru-Hiking Route

The Mojave-Sonoran Trail
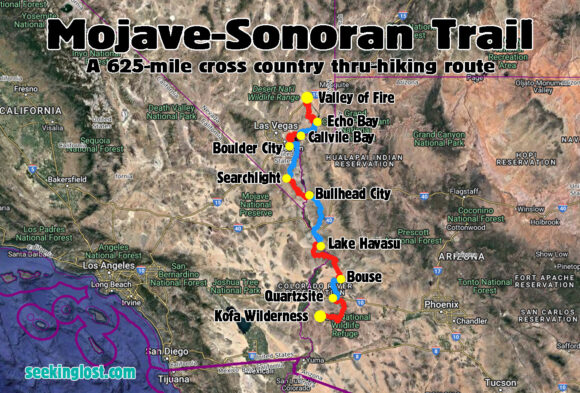
A 625-mile cross country thru-hiking route connecting southern Nevada to Southern Arizona via the Colorado River corridor
Introduction to the Mojave-Sonoran Trail
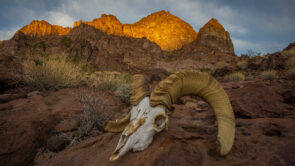
The Mojave-Sonoran Trail is a 625-mile cross country thru-hiking route along the Colorado River corridor though southern Nevada, California and Arizona. The MST traverses two distinct desert environments; the 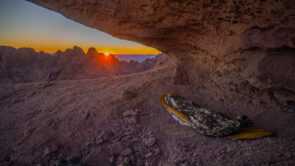 Mojave Desert and Sonoran Desert. This route allows the hiker to experience the transition zone from Mojave to Sonoran desert, while connecting 12 mountain ranges, 12 wilderness areas, 2 National Wildlife Refuges and the massive Lake Mead National Recreation Area in an effort to explore this remote and stunningly beautiful region. Experienced cross-country thru hikers looking for a challenging desert hike that can be done in the winter months will find the Mojave-Sonoran Trail fits the bill, with prime hiking season running from November to March.
This region of the country doesn’t get much attention from the backpacking community, but Mojave-Sonoran Trail hikers will quickly discover that they’ve stumbled upon a
hidden gem. Walk the top of massive mesas, the bottom of colorful slot canyons, along the shores of Lake Mead and across vast desert plains. Summit lonely desert peaks, walk among red rocks and sand dunes, through deep canyons and gorges, climb dry waterfalls and walk countless ridges overlooking fairytale-like desert landscapes. Explore old mines, tunnels and caves, find cool rock and minerals, visit hot springs and ghost towns, sleep in old cabins, discover petroglyphs and artifacts. The Mojave-Sonoran Trail route presented here can be hiked as-is, or better yet, used as a blueprint for your own Mojave/Sonoran Desert trek.
Quick Facts
Miles: 625
Seasonality: Nov – Mar
Time to Complete: 5-7 weeks
Highest Point: Spirit Mountain, NV: 5,642′
Lowest Point: Parker Dam, AZ/CA Border: 392′
Mountain Ranges: 12
Wilderness Areas: 12
Trail Journal/Photos & Video Series
Mojave-Sonoran Trail Journals & Photos
Section 1 – Valley of Fire to Echo Bay: 66 Miles
Section 2 – Echo Bay to Callville Bay: 50 Miles
Section 3 – Callville Bay to Boulder City: 40 Miles
Section 4 – Boulder City to Searchlight: 80 Miles
Section 5 – Searchlight to Bullhead City: 58 Miles
Section 6 – Bullhead City to Lake Havasu: 104 Miles
Section 7 – Lake Havasu to Bouse: 92 Miles
Section 8 – Bouse to Quartzsite: 37 Miles
Section 9 – Quartzsite to Kofa: 95 Miles
Join the Mojave-Sonoran Trail facebook group to stay on top of the latest updates and info on the trail, as well as connect with other potential MST hikers.
Type of Hiking
The Mojave Sonoran Trail is a cross country route, not an actual hiking trail. Only about 16 miles of my route was on a hiking trail. The rest was cross country, old two track roads and less frequently, larger dirt roads  and paved roads (minimal). Roughly 40% of the route is cross country (still need to calculate exact numbers). This is a desert route, with elevations ranging from 300-5,600ft. In the Mojave Desert, there is less vegetation to contend with when hiking off-trail. The Sonoran Desert is thicker, thornier and bushier. Occasional bushwhacking is needed, but nothing extensive or daunting. While the emphasis on ridge walks, high routes and peak bagging is always high, this route is also heavily geared towards exploring scenic canyons. In both the Mojave and Sonoran deserts, spectacular deep and colorful canyons are plentiful, and are a main draw to this route. Dry waterfalls are extremely common, and there are perhaps hundreds to negotiate along the way of varying difficulty. No technical gear is needed, although a length of cord to lower your pack when downclimbing is highly recommended. Distance between resupply is 100 miles or less. Big water carries are common.
Route Overview
The Mojave-Sonoran Trail is a 600 mile cross country thru-hiking route that traverses the Colorado River corridor though southern Nevada, California and Arizona. In this region of the country, the Colorado River ROUGHLY represents the border between the Mojave and Sonoran deserts. While the route begins in the Mojave desert, and ends in the Sonoran desert, the route often meanders through the transition zone between the two different desert environments, before finishing deep within the Sonoran Desert.
The route is mostly cross-country hiking and along old 4×4 roads, with only a few miles of marked hiking trails along the entire route. The route follows the general path of the Colorado River, but seldom does it reach the banks of the river itself. Instead, the route traverses the mountain ranges alongside the Colorado River, with open desert treks connecting these ranges as needed.
Terminus Points
The northern terminus is just outside of Valley of Fire State Park in southern Nevada, about 1 hour east of Las Vegas. The southern terminus is Palm Canyon in the Kofa Wilderness of Arizona, about 1 hour north of Yuma.
Travel to the northern terminus is easy. Fly into Las Vegas, grab an uber to the Hidden Valley exit along I-15, about 45 minutes east of Las Vegas. There’s not much here, but it makes for a short route to some excellent Day 1 hiking along the spectacular Weiser Ridge, overlooking Valley of Fire State Park.
Travel to/from the southern terminus is slightly more challenging. There is ample traffic at Palm Canyon/HWY 95 to hitch south to Yuma, where one can take a plane/train/bus to your final destination. Shuttle service is also available. Call Terri at 951-390-5818 (Faithful Shuttle) to inquire about rates.
Mojave-Sonoran Trail Terminus Point GPS Locations
Northern Terminus: 36°38’10”, -114°35’54”
Southern Terminus: 33°23’19”, -114°13’01”
Pace & Time on Trail
The MST is an off-trail route. Miles can be very slow at times. Additionally, there is limited daylight during the late fall and winter months, which cut into the time a hiker has to cover miles. I averaged 18 MPD, but I also spend about an hour a day filming and taking photos, recording waypoints, documenting water sources, exploring old mines etc. Strong hikers with solid cross-country experience should be able to get 20 MPD or more. Be prepared to be humbled by the occasional 12 mile day, though. I completed the route in 7 weeks, with 9 zero days. 6 weeks would be a good time frame for many hikers to shoot for.
Seasonality
The Mojave-Sonoran Trail is one of the few long distance hiking routes that can provide the hiker a warm climate to hike in the winter months. The MST is not a summer hike, the temperatures are simply too hot. The best time to hike the MST would be between November and March. Choose your state date depending on your tolerance for hot/cold temps.
This hike could easily be done in the dead of winter. Water should be more plentiful than the fall. Mild to warm daytime temps, colder nights, and the possibility of a little snow once or twice at the higher elevations (4,000+). These storms generally move through quickly and are not prolonged. The vast majority of a winter hike along this route should see excellent hiking weather.
I hiked this route from Nov 1st – Dec 18th. It was an unusually warm and dry fall in 2021. Temps reached 90 in the Vegas area during the first few days, 80s for the first two weeks or so of November, then mostly 70ish for the duration of the route. Overnight lows were generally no lower than 45 for the majority of the trip, until the last week when the weather finally turned. My coldest night was 21.
Direction of Travel
The MST could be hiked in either direction, NOBO or SOBO. Your start date will have the biggest influence on your direction of travel. Starting Nov 1st, I chose to hike SOBO. This allowed me to have the coolest possible temps for the given time of year, by starting in the north where temps are about 8 degrees cooler on average than the southern terminus. As I travel south, the temps will increase, but they are also declining at this time of year as winter approaches. This allowed me to maintain a pretty consistent climate of 70 degrees or so for the majority of the hike. The opposite would be true starting late winter, closer to spring might consider hiking NOBO to follow the weather.
Those seeking the coolest possible temps will want to hike in December and January. Jan-Feb would be the more realistic time frame for most winter hikers (starting after the holidays), and this would still be a good time to avoid the heat. NOBO makes more sense here as the southern terminus is 12 degrees warmer than the northern terminus during the winter months.
From here on out, the information presented in this guide will be from a SOBO perspective, because that’s how I hiked it 🙂
Route Origins
Until recently, thru hikers seeking a trail or route that could be hiked in the winter months and feature warm weather/no snow had few options. Over the last few years, Brett Tucker has been developing the Desert Winter Thru Hiking Route to fill that void. And it looks like an excellent route that I myself am looking forward to walking someday in the near future. The Mojave-Sonoran Trail is my attempt at the same idea; a warm-weather winter thru hiking route in the southwest.
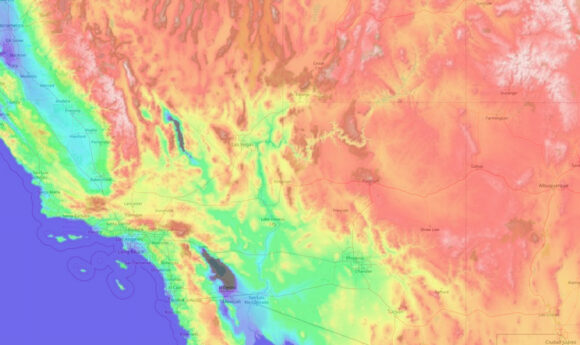
I got the idea for the general path of the route one day by looking at an elevation heat map of the United States. I noticed the lower elevation along the Colorado River corridor extending as far north as St. George, UT and all the way down to Mexico. Having hiked in the Las Vegas area before, I was familiar with its beauty and ruggedness, and surprised by its remoteness. However, I hadn’t spent much time exploring south of Vegas yet, along the Colorado River. There are practically zero backpacking reports from this part of the country, but the occasional peak bagger’s report gave a glimpse at the potential of the ranges that run alongside the Colorado River. Impressive, indeed. The climate fit my requirements, the terrain looks to be beautiful, and the region is lightly traveled. After mapping the most interesting route I could string together and plotting water sources, it all came together to become the route I present here; the Mojave-Sonoran Trail.
Mojave-Sonoran Trail Map
The Mojave-Sonoran Trail map is the main planning resource. Here, nearly everything you need to know about hiking the MST is presented in the map. Unfortunately, when linking to the map, the default view has all of the waypoint labels visible on the map, making it too cluttered to really view. You can download your own copy to work with. Read on to learn more.
How to use the Mojave-Sonoran Trail Map
To ensure you have the most up-to-date version of the map, view the Mojave Sonoran Trail Map in Caltopo and click “export” to download your own copy. Export the GPX format to use in a garmin device or on your phone, but if you plan on editing your own copy of the MST map, I recommend exporting the map in the JSON format. This retains all of the waypoint info that is useful… color-coding of water sources, different icons for campsites, water caches etc, different track colors for the main route vs alternate routes, and more. Next, upload your JSON (or GPX) file to caltopo (or Gaia, etc) and edit away! You can later export a GPX file from caltopo for your device when ready.
You can also download the Mojave Sonoran Trail GPX file. However, keep in mind that the GPX file here will not be as up-to-date as visiting the caltopo link above and exporting your own copy. Changes made to the Mojave-Sonoran Trail caltopo map will instantly be pushed out to anyone visiting the caltopo link. Updating a downloadable GPX file (like the one above) requires manually replacing the GPX file every time a small change is made, and that is not an efficient way to bring you the latest updates.
Here’s a breakdown of the caltopo map “categories” to help you make sense of the information presented on the map:
- MST 2.0 – This is the current suggested MST route, with revisions from the first passage
- Resupply, Terminus – View Resupply points, hitching locations, terminus points, etc. Resupply points/town are green, hitching points are yellow
- ALTs – Alternate routes. Mostly untested
- POIs – Points of interest… peaks, arches, caves, etc
- Water – Color coded by probability of having water. Blue = Definitely, Green = Maybe, Black = Dry
- Markers – Various waypoints to be aware of
- Mines & Rocks – Info on abandoned mines and old prospects along the way, for rockhounds 😎
- Cache – Suggested cache locations
- Boundaries – A waypoint to mark when you enter/exit a new land administration type
Land Administration
Land Administration along the route falls into two main categories: BLM land and National Recreation Areas/National Wildlife Refuges. Both of these can include wilderness areas. Much of the route through Nevada traverses the Lake Mead National Recreation Area, making up the first half of the MST. South of the Nevada section, the second half of the MST is mostly on BLM land, and much of this is through wilderness areas.
Land Administration Breakdown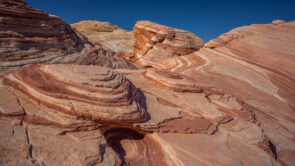
- Wilderness Areas: 12
- Wilderness Study Areas: 1
- National Wildlife Refuges: 2
- National Recreation Areas: 1
- National Monuments: 1
- State Parks: 1
- BLM Land
- Arizona State Trust Land
Permits
The majority of the first 300 miles or so are through the Lake Mead National Recreation Area. The $80 annual National Parks pass gives you entry to Lake Mead. You won’t need to show the pass to enter the park on foot, because you won’t be stopping at a booth along the road, but if you get stopped for any reason, this pass is what you need to have to be legal. You can buy this in person at the fee stations at the entrance to the Lake Mead NRA. Not all locations are manned, though. The stations on Lakeshore Rd (east of Boulder City) and on E Lake Mead Parkway/Lakeshore Rd just east of Lake Las Vegas were both manned when I passed through the area, but the stations near Moapa Valley might be open and unmanned.
Additionally, there are small sections (a few miles) of Arizona State Trust Land that require a $15 annual permit, which can be purchased online HERE. Law enforcement on Arizona State Trust land is, to the best of my knowledge, not limited to one agency. Instead, the local sheriff, BLM or whoever has the authority to cite a person for not having the necessary permit. With that said, there are only a few miles of hiking on AZ state land, and it’s highly unlikely that you’d see another human along any of it. Just know that to be legal, you need the Arizona State Trust Land permit.
Water Availability
The Mojave-Sonoran Trail is the driest route I’ve ever hiked. 2021 was an unusually warm and dry fall, which definitely impacted water availability for me. Many springs and guzzlers that would probably be reliable, were not because it was such a dry year. Still, the route presented here has been hiked successfully, thus proving its viability for sustaining a thru-hiker even in the driest of times. While the Mojave-Sonoran Trail will always be a dry route, experienced hikers should have no problem making the water sources along the MST work for them with proper planning. 160+ water sources have been identified along the route, with notes of field observations.
Water can generally be acquired once a day. The biggest carries span two days. Although the route follows the Colorado River, it’s usually not close enough to be used as a water source. Along the first half of the route, the river can be used as a lifeline in case you get into trouble… if you can get down to the water, that is.
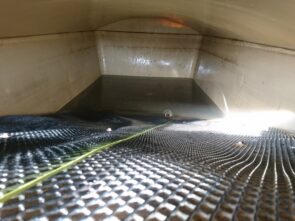
Water along the Mojave-Sonoran trail comes from a variety of sources. Lake Mead and the Colorado River are only occasional water sources. Water can be found in springs, troughs, wells, guzzlers, campgrounds, and strategic stops through small towns or a small business. In a few select locations, such as Valley of Fire State Park, tourists are plentiful, and you can pretty much count on being able to yogi some water. Additionally, caching water ahead of time can drastically reduce the length of water carries in some sections. Small game guzzlers in Nevada offer a potential water source, if you can get to the water. These often require crawling under an awning about 18 inches off the ground, tying a cord to a wide mouth water bottle filled with rocks for weight, and chucking the bottle into the guzzler’s underground collection tank in order to retrieve water. Slow and tedious, but a viable way to extract water from these critical water sources.
What is the longest water carry?
My longest water carry was a result of two water sources not working out for me. I hiked 50 miles on 5L of water over 2.5 days in section 5, Searchlight to Bullhead City. I would now recommend placing a water cache along this section to reduce this carry to a more reasonable 30 miles or so. And in-between that, a small game guzzler exists that could yield some water with a plan to access it (the small game guzzlers are tricky). Ultimately, how long your longest water carry will be depends on whether or not you will be caching.
If you were to cache water at all of the suggested locations, the longest water carry would be:
32 – Section 5, in between Searchlight and Christmas Tree Pass. Two small game guzzlers along the way, but water extraction could be difficult in dry years. The guzzlers would reduce the carry to 19/20 miles, and may have water in wet/normal years
31 – Last 31 miles of section 6, Lake Havasu Wilderness. Unverified Spring along the way, 1 mi off route. Option to detour to Colorado River for water (1 mile) about 10 miles into this carry. Option to end this section at 16 miles into carry
27-30 – Section 7, Whipple Mountains. Water may be found at mile 27, if not at mile 30. No option to cache along this route
25 – Section 7, final 25 miles to Bouse. Very flat, easy miles
23 – Section 9, final 25 miles to end the hike.
If you don’t cache at any of the suggested water cache locations, you longest water carries would be:
35 – Section 1, days 1 & 2. Option to yogi water from some of the only day hikers you’ll see on this route (easy) at mile 25. Caching splits this up to ~17 miles
31-40 – Section 4, Gold Strike Hot Springs to Nelson. Caching reduces the carry to ~19 miles
45+ – Section 5 is full of unreliable water sources. It could be 45-50 miles to Lake Mojave for water if you can’t get water from small game guzzlers, if Sacatone Spring is dry and potholes are dry Cache at Christmas Tree Pass to mitigate this risk.
52 – Section 6, Warm Springs to Lake Havasu City. Don’t freak out about this one. There are many options to make this carry much shorter, but you need to look at the map and pick one of the options yourself. An alternate to a truck stop, an unverified spring, detour to the Colorado River, and cutting miles off the end of this section are all options to reduce the water carry mileage. You might not want to cache here at all, but it’s an option.
Typical/most liters of water carried?
On average, I was expecting water once per day, and carried 5L… 4 for one day, plus an extra liter in case it takes a little longer. The most I carried was 8L, for two days. Future hikers can benefit from caching at a couple of locations I didn’t, as well as benefiting from having some beta on water sources along the route in the form of the Mojave-Sonoran Trail Water Chart.
Caching Water
Caching water ahead of time at a few key places along the route is a good option. For those flying into Vegas, you can rent a car and drop off water over the course of 2-3 days. This also gives you a chance to scout the route a little, and some of the towns along the way. Not caching water would result in water carries of 2+ days in a couple of places. The route is still doable without caching, but caching water certainly makes it easier. Suggested caching locations are marked on the Mojave-Sonoran Trail map for reference.
Mojave-Sonoran Trail Water Chart
I’m working on releasing some sort of water chart for the MST, but for now, you’ll need to do the leg work yourself to determine distance between water sources. Just use the “profile” function in caltopo to read the mileage of each water waypoint, and the mileage to the next one. All of the water waypoints have notes from field observations in the waypoint descriptions. This is what the info in the water chart will eventually be populated with.
Water sources that I’ve personally visited will have notes describing what I saw. Water sources I did NOT visit will still have notes, based on what I saw from satellite when I researched them prior to my hike, and any other sources of information I could fine (water report, etc).
Resupply Strategy
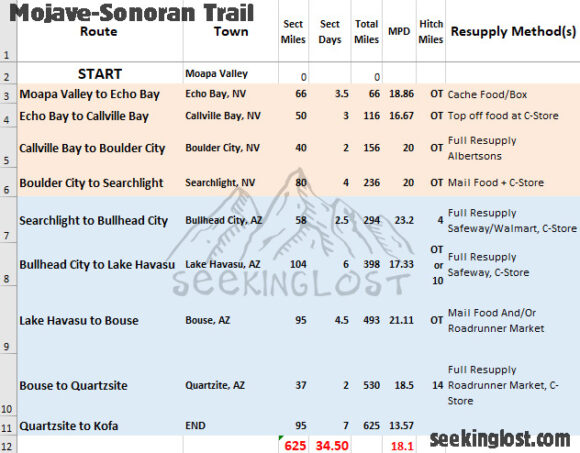
Resupply on the Mojave Sonoran Trail has been broken down into 9 sections, with 8 resupply stops. Much of the Mojave-Sonoran Trail can be hiked without the need to hitch into town for resupply. It’s a 4 mile hitch into Bullhead City, if you want to. The only place it would be truly necessary is 14 miles into Quartzsite.
Mojave Sonoran Trail Resupply Strategy Spreadsheet Download
I use a spreadsheet to organize my plans for resupply along my long hikes. It gives me a quick way to refer to all of the information I need on the go. I just load the spreadsheet on my phone and refer to it as needed. You can download my template to get started, and modify it to fit your plans:
Resupply & Logistics Tips
Before the hike, it’s recommended to cache water (and possibly one box of food) along the route if you can. If you are driving your own vehicle to Vegas to start the hike, this will be easy for logistically, having your own vehicle. If you are flying in, you can rent a car for 2 days or so to make the drive to the cache locations. This route can be done with no caching, but that will result in longer water carries. That would mean 2 days of water vs one day in a few locations. I did two day carries in many locations, so it’s possible without caching if you aren’t able to do that pre-hike.
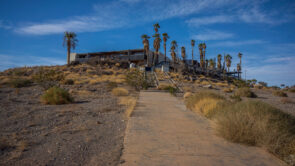
Sections 1-3: The most difficult sections to resupply are at the beginning of the hike, in the Lake Mead National Recreation Area. At the end of section 1 (Echo Bay) and section 2 (Callville Bay), resupply options are limited. Echo Bay used to be thriving, but the low water levels of Lake Mead have left the place largely abandoned these days. To a lesser extent, Callville Bay was also effected, but had held on more than Echo Bay. It’s 156 miles from the northern northern terminus to Boulder City over 3 sections, and there are a couple of options for resupply during this stretch:
- Leave a food box at Echo Bay. There is NO MAIL here, so you must drive here before the hike and visit in person, unfortunately. Try to leave a box with the store clerk, RV park camp
host, etc. If that fails, try stashing your food in the abandoned motel next to the c-store. Make sure to use odor proof bags if doing this. Caching food by burying it is not specifically listed as prohibited on the Lake Mead National Rec Area’s website, but because it’s federally owned, you can bet it’s not allowed. I haven’t clarified this yet, though. You will want to cache enough food to last to Boulder City for sections 2 AND 3, minus basic c-store snack items like nuts, chips, jerky and candy from Callville Bay’s Marina Store. You can also get a hot meal for lunch or dinner here at the restaurant, so factor that into your resupply plan as well.
- Skip Echo Bay, and hike 111 miles from the northern terminus to Callville Bay. From there, it’s about 40 miles from Callville Bay to Boulder City, a two day walk. Callville Bay Marina Store offers chips, jerky, candy, nuts etc, not much else for food. They do have a restaurant for lunch and dinner. From the northern Terminus, you could bring enough of your staple food items (that you can’t get at Callville Bay) to last to Boulder City, and use Callville Bay to resupply basic c-store snack items, and pig out at their restaurant.
- Hitch into Overton to resupply (full grocery store). The best place to hitch into Overton would be along Northshore Drive, before hiking towards Echo Bay. This is roughly 50 miles into the hike, with about 105 to reach Boulder City, the next full resupply opportunity. Hitching is difficult here. Most people driving around here aren’t heading into Overton. Getting a hitch back out to Echo Bay is even harder. But it is possible. By hitching into Overton and resupply at 50 miles in, you could carry food for sections 2 and 3, over 105 miles, minus the food you can eat at Callville Bay’s restaurant and the snack items you can buy there at the Marina Store.
Boulder City: Once you reach Boulder City, your resupply and logistics for the rest of the hike is a little easier and more straightforward. Boulder City is a full resupply, with an Albertsons and everything you need. Since Searchlight, the next town stop, only has two c-stores (no actual grocery store or market), you might consider sending yourself food items from Boulder City… the things you can only find in larger grocery stores. Send to the PO if you think you’ll get there during operating hours/days, otherwise, call one of the two hotels and ask to send a box. I recommend starting with the El Rey motel first, and only considering the BV Motel as a last resort. That place is wild, and not in a good way.
Searchlight: This was not my favorite town stop. The town is rundown and appears to be a high crime place. Everything you need in town is within two blocks though… two C-Stores, McDonalds, Denny’s, PO, 2 motels. Full resupply is not really possible here. but it’s only 2.5 days to Bullhead City… so if you aren’t picky, you could do a combination of McDonald’s food and gas station stuff and probably make it work. However, the recommended strategy would be to send a food box from Boulder City that has anything you can’t get here. The El Rey Motel was booked, so I had to stay at the BV Motel next door. This place was cash only ($60), dirty, and full of oddities. For example, the full size mattress on a twin size box spring… the mattress hangs off the edge of the box spring. Door knobs under the bed, no shower curtain, dirty, no wifi, can see under the front door, just a weird place. In the distance, a man with the most shrill, frantic voice I’ve ever heard was screaming for hours about how he was going to kill someone. The good news, this motivated me to not take a zero, and just leave the next morning.
Bullhead City: Everything you need, but unfortunately, the layout of the town is spread apart. All the hotels are in one place, the restaurants in another, grocery and retail stores somewhere else. Uber and Lyft operate here, and there is also a bus (red route) that runs once per hour. Apparently the Post Office is pretty bad here (read the google reviews before sending anything), so it would be best to send packages to a motel instead if needed.
Lake Havasu City: This section has a few different alternates and options. Cold Springs Station (40 miles into this section) offers chips, jerky, a few candy and snack items, soda… maybe enough to be considered “lunch”. Around mile 60 into this section, there is an option to take a 6.6 mile alternate route to a truck stop/travel station with multiple fast food restaurants, shower and typical large c-store food items. This route would add about 4 miles to your overall distance. It would also mean that those 4 miles would be paralleling Interstate 40, so keep that in mind. Lake Havasu City is a large (55k population) and sprawling city. The ideal location to stay is near the London Bridge… this is right next to the docks for the ferry across Lake Mojave to start the next section, there are multiple grocery stores, hotels, PO, restaurant, etc. Lake Place Inn offers cheaper rates, and is 1.5 miles from the Havasu Landing Ferry.
Bouse: After crossing the Parker Dam (must hitch across, no pedestrians allowed), you’ll reach the Hez-ron gas station/C-store, around 45 miles into this section. Typical c-store food, with some microwavable items like burritos and hot pockets. The owner is not very welcoming, and will insist you remove your pack and put it behind the counter while in the store. This doesn’t stop him from staring and scowling, though. Not a pleasant man. It’s unlikely he would let you use his hose or spigot for water, but you can always just buy a gallon of water from the cooler. In Bouse, resupply options are slim. The Coachman Cafe is only open until 2:30pm, and closed Mondays. You can get a meal here, but you better hope you have the same political affiliation as the owner. Yeah, it’s one of those kind of places. The Somewhere Bar has food too, and is open to 6pm, but is a little farther away. A Family Dollar exists, and a small store called the Roadrunner Market. The Market has a small selection of grocery items, probably enough for most people to cobble together 2 days of food. If you have any doubts though, you can send a food box to the Bouse PO. The worst part about Bouse is that there is nowhere to stay the night and get a shower. The Bouse RV Park refused service to me because I was in a tent. Yup! There’s the Just For Fun RV Park across the street, but they have no shower. What’s the point, then? There’s the Bouse Community Park about 1.25 miles west of town on Plamosa Rd. but they also don’t have showers, and charge $14 a night. There is a day use area here where you can fill up water, use the bathroom, and a pavilion with electrical outlets that were OFF. The camp host was unfriendly, circling a bunch of times in her golf cart before finally approaching and saying “you know this is a day use area, right? You need to be gone by dark”. Geez. Bouse was hands down the least welcoming town stop I’ve ever had as a hiker. Fortunately, Bouse is a great town to get what you need quickly and walk out without staying the night. BLM land is right across the street from the Bouse Community Park, camp there for free and move on.
Quartzsite: Quartzsite is a weird town. This area is home to a massive influx of RV campers who spend the winter in the desert nearby, to the tune of about 250,000 people a year. The entire town is a mixture of trailer parks and flea markets. Quartzsite has everything you need, though. The Super 8 Motel is located on the far west side of town, far away from everything else. There is also the Stagecoach Inn which is much more centrally located. In addition to these two hotels, you might find a room to stay in for the night by walking the streets near the flea markets, there are signs advertising rooms, showers etc, despite not showing up on internet searches for motel rooms. The Camel Express (Quartzsite public transportation) bus provides transport across the city, anywhere you want to go, for $.50 each way. They will make multiple stops along the way for you too, while you run into a store, they will wait. Call (928) 927-4333, Option 3 to schedule a ride. There are multiple small markets, but the Roadrunner Market is probably the best stocked. Still, the selection is thin, barely meeting the threshold to be called “full resupply”. They don’t have basic things like whole wheat bread, tortillas etc. Between the Roadrunner, Family Dollar, Coyote Fresh Foods and multiple C-stores, I’m confident you will find Quartzsite to be a full resupply city, albeit just barely.
Gear List & Recommendations
A link to my lighterpack gear list: https://lighterpack.com/r/4aj6eq
The Mojave-Sonoran Trail is a pretty easy hike to pack for. The weather is very consistent and generally warm to mild. Winter hikers will want a 20 degree bag, and fall/spring hikers will probably be good with a 30 degree bag. For my hike (Nov-Dec) I used a 40 degree bag, and only regretted it one night, the rogue cold night of 21 degrees. I used a Tarptent Notch Li tent, and cowboy camped maybe 1/3 nights. I was debating whether or not to bring a foam sleeping pad, but went with my thermarest neoair inflatable. I’m glad I did, because it held up pretty well. I got a couple of pinholes along the ay, likely from one or two campsites, and just patched them in town when I got to a bathtub to submerge/test it. Make sure you carry a patch kit if you bring an inflatable!
This is a desert hike, so go light on the rain gear. I carried a zpacks Vertice rain jacket, and carried no rain pants. Wind Pants like the EE Copperfield pants would work well for what little rain you would possibly encounter, if you wanted to bring a pair.
This route will have you using your hands quite a bit. Not only for climbing, but on bushes and branches, and cacti (inevitably). I recommend some type of gloves to protect your hands. I’m using the Fish Monkey fingerless gloves, which I find almost perfect for this type of thing. Fingerless is a must for me for using electronics, and these are thin and flexible enough to not be cumbersome, yet still provide plenty of protection.
I went through two pairs of Brooks Cascadia 13’s on this hike. Yup, still rocking 3 year old shoes, I buy them cheap after the new models come out. I lost like 70% of the tread on my shoes on day 1, due to some razor rock (limestone) along Weiser Ridge near Valley of Fire. There are parts of this route that will eat up your shoes, so be prepared to swap them out half way, perhaps Bullhead City or Lake Havasu.
TIP: Bring an end-of-life pair of shoes for the first day of this hike, since you’ll eat all of the tread on new shoes on Weiser Ridge (Day 1). Carry your new pair of shoes until day 2 when you get to the trailhead in Valley of Fire State Park, throw out your old ones here, and carry on in your new pair.
Some sort of pre filter is a good idea to have in your water filtration kit. I use women’s pantyhose for this. Weighs nothing and works well. Use your hand to spread apart the fabric when filtering water to allow it to seep in. You will also need to have a plan to draw water from the small game guzzlers along the route. For example, mine included a wide-mouth Gatorade/Powerade bottle and cord. I also use the cord to lower my pack on downclimbs.


