
Chevy Astro Camper Van Build: Media Center
Chevy Astro Camper Van Build Phase 17: Media Center

Tools & Materials
Materials:
Android TV Box
5v DC Power Cord For Android TV Box
Anker 36W Dual USB Car Charger Adapter
4TB Portable HDD
Shock Cord
HDMI Cable
Tools:
Dewalt Cordless Impact Driver
1/4″ Drive Quick Release Bit Extension
Craftsman 3/8 Drive Drill
Drill Bit Set
Tape Measure
Screwdriver
Video – Chevy Astro Camper Van Build: Media Center
Project Overview: Media Center
Since I’ll be using a computer monitor instead of a smart TV, I’ll need some sort of “smart device” to run my media center. My first thought was a Raspberry Pi, but hen I found something even simpler… an Android TV Box. It does just what it sounds like; it runs android and runs apps that allow you to watch or stream media. I found a power cord to run it off of DC current, so powering it is not an issue. I will be able to plug in an external HDD that I can load up with movies, TV shows and whatever, for the times (most of the time!) when I don’t have internet.
Testing The Media Center Setup

When I first received my android TV box, I did most of the setup inside the home. I tested that it could read USB flash drives with movies and media files, tested that it could power and read my external HDDs, and learned the layout of the operating system. It came with two remotes, one normal remote and one with a full keyboard and mousepad.
Mounting The Android TV Box
I decided to mount my android TV box on the ceiling, above the monitor next to my shelving. Here, it’s out of the way, the cable runs are short, and I can read the screen on the front face of the unit.

I had to get creative for the mounting of the android TV box inside my van. I used a thin (3/8″ or so) sheet of wood and cut it into a rectangular shape, roughly 5″x8″. I rounded the edges on the belt sander to make them smooth. Then, I placed the android box on top of the wood piece to se where it should be mounted. I choose a spot, and drill two screws in line with each other along one of the narrow sides of the board, bout a half inch in. I place the android box against the screws and mark the backside of the unit on the board. Here, I install a hanger hook. The android box fits snugly between these three points, but I still need to hold it down with something. I use shock cord for this. I tie the ends to the screws and then pull it over the hanger hook to secure the android box to the mounting board.

I drilled out two holes to mount this board to the ceiling. These screws will sit above the android box, hidden when it’s installed. I’ll also use the same drywall screws that are used to mount the cedar planks to the ceiling. I’ll measure them from center to center, transfer this mark to my mounting board, drill pilot holes and then mount the board to the ceiling using the existing holes through the cedar plank ceiling.
Mounting The External HDD
This is kinda tough to explain. You should really just watch the video I made that shows this part in detail. But if you want to read my attempt at explaining it, well here you go.

The external HDD came with a soft neoprene case, with a sort of “flip top”. I flipped the top open and back, now the top faces the ground and the large part of the pocket, where the HDD fits, faces up. I cut a thin (1/8″ or so) rectangular board that would fit inside of the top part of the neoprene case that now faces down. In other words, if the little board was mounted to something, the neoprene case could just be slid over the board and sit on top of it.


First, I make a vertical slit into the front of the neoprene case with a knife, about 1-2″ wide. I drill holes through both the neoprene case and the mounting boards behind it. I get some screws started in the holes, then mount it to the shelving above my monitor’s swivel arm, and below the media center on the ceiling.

Once the case is mounted to the shelving, I add a thin piece of neoprene as a backer inside the neoprene case, to protect the backside of the HDD as it slides against the screws that are used to mount the case. The HDD just slides into the pocket now, with easy access for cables and frequent removal.
Can I Use An Android TV Box In My Camper Van To Power A HDD?
The above is what it all really boils down to for me. I had to figure this out on my own. The answer is yes!
The HDD itself draws very little power. Less than .2 amps. So here’s my power setup for the Media Center:
Anker 36W Dual USB Car Charger Adapter
5v DC Power Cord For Android TV Box
Each of the two USB ports on the Anker charger is 18W, which can support 3.6amps at 5v, which is what the android box runs on. The android box inly uses about .2 amps on it’s own, though. So if 3.6 amps is being sent to the android box, and it’s only using .2 of those amps, it has some extra to pass on to the HDD. That’s great news, because we don’t want to have to plug in an extra HDD, when the android box can power it on it’s own through the same cable that data passes through. The android TV box and the HDD combined, I see about .3 to .45 amps being drawn, which is minimal.
Using The Media Center

I plug the android TV box and the monitor into the same 2-outlet bank, controlled by one switch. So, I an flip one switch and turn on the monitor, android TV box and the HDD simultaneously. Cool.
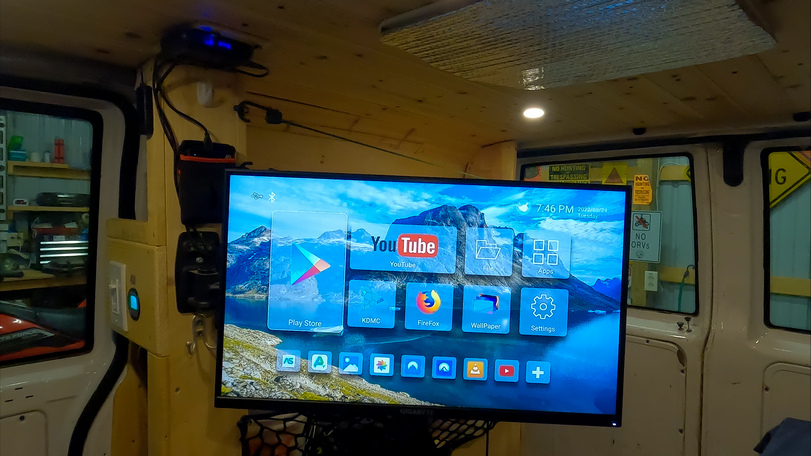

The android box boots to a familiar android operating system with a series of apps to choose from. KDMC (Kodi) is the main app I’ll use for my media. This is a media center app, and it allows you to specify an external drive to scan for media. It finds my 4TB HDD and boom, there’s all my shows and movies! It’s really that easy.
Because it’s android, there’s a ton of apps to choose from and there’s a bunch of cool things you can do with this device. For example, I’ll be bringing my guitar on my next trip, and I’ll want some guitar tabs to play along with. So, I found an app that reads guitar pro tabs, and I load up my collection on the android box. Now, I can play along to guitar tabs as they scroll across my monitor. Pretty damn cool!
Previous Van Build Project: 16 – Computer Monitor | Van Build Project Index | Next Van Build Project: 18 – Cell Signal Booster


Leave a Reply