
Chevy Astro Camper Van Build: Pull Out Slat Bed
Chevy Astro Camper Van Build Phase 7: Pull Out Slat Bed

Pull out slat bed build
Tools & Materials
Materials
Drywall Screws
Electric Poultry Knife
Spax Construction Screws
Drywall Screws
L Brackets
1/4″ Washers
Foam Mattress, 5″ Thick, (HD36)
2×3 Boards
1×4 Boards
1×3 Boards
Tools
Dewalt Compound Miter Saw
Dewalt Cordless Impact Driver
1/4″ Drive Quick Release Bit Extension
Craftsman 3/8 Drive Drill
Speed Square
C Clamps
Video – Chevy Astro Camper Van Build: Pull Out Slat Bed
Project Overview: Pull Out Slat Bed
The bed I am building is not unique. There are many resources across the internet describing how to build this exact bed, and I advise you to look at several of them to get a feel for slightly different variations of the same build.

Dimensions of my bed
I’ll be building a pull out slat bed/sofa that also folds up, to access storage underneath. The bed I’ll be building is called a slat bed. The The bed is made of two main pieces; the main part that’s fixed to the floor, and a sliding part. The sliding part stays together with the bed, until you want to pull the bed out and make it wider. The sliding part moves outward, and the sofa cushions are used alongside the main part of the mattress to make one large(r) bed.
The key to this bed’s pull out capabilities are the wood slats. The slats are laid out over both the fixed and sliding portions of the bed, but each slat is only screwed down to either the main part OR the sliding part of the bed, not both. The slats alternate, one is screwed to the fixed part of the bed, the next is screwed to the sliding part. When the bed is pulled out, Half of the slats stay with the fixed part of the bed, the other half move with the sliding part. Make sense? It’s kinda hard to conceptualize, but photos and video help.
The bed will also fold up. This is accomplished by a hinge connecting the bed to the bed’s support beam on the wall.

The finished sofa bed, with sheets
In this phase, I’ll also make a cut my own foam mattress and make a mattress cover sheet to fit over it.
Building The Top
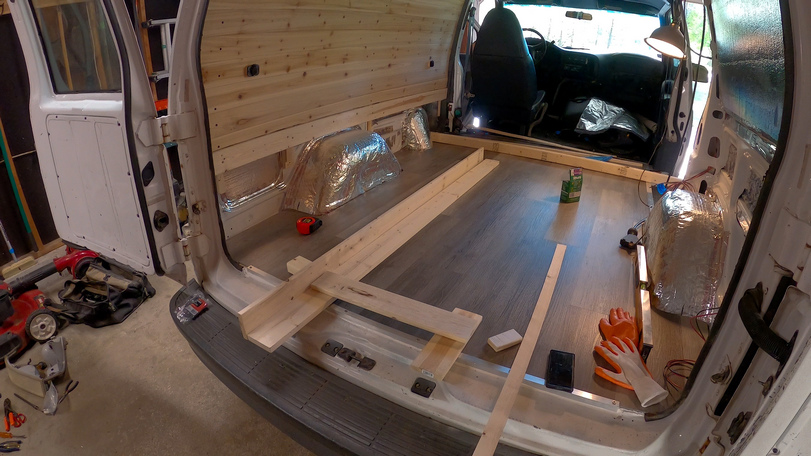
Laying out the boards and trying to visualize the project

Getting it squared up
The first step is building the top of the bed. I start by laying out a few boards in the van and measuring my space. For the bed length, I wanted to leave a few extra inches at my head and toes to avoid feeling crammed in. I’m just shy of 6ft tall, and I settle on 75″ for the length of my bed. This also worked great because the foam mattress I bought is also 75″ in length. Nice!
To build the side of the top piece, the part that I’ll pull on when pulling the bed out, I’ll lay a 1×4 on the ground and then another 1×4 alongside it, running vertically. Then I use spax construction screws to fasten them together. Having a set of clamps helps hold everything in place for this step. I need two of these L shaped boards.
This next part is hard to describe, and better left for photos and video (see the next photo and paragraph below). But here’s my attempt. What I’m doing here is lining up four parallel running 75″ boards. The two outer boards will be L shaped, like I described above. These hold the mattress in place on the top, and one side gets bolts to the bed support beam on the wall. Remember that there are two parts to the bed, the main fixed part and the sliding top part. The fixed part of the bed gets one L shaped piece of wood, and one flat one on the opposide side for the slats to connect to.

See the photo above. The four boards under the slats… the two outer boards are the L shaped ones, and the two inner boards are flat 1x3s. One of the inner boards is pushed up against the outer board, making it look like one wide board. The 1×3 in the center needs to be moved farther to the right, ultimately. Remember that every other slat gets screwed to one of the two sets of boards underneath. So here’s what needs to happen; the L board on the left, slats that are screwed to that one get screwed to the board that’s currently in the middle. The L board on the right, slats screwed to that one get screwed to the left-most inner flat board beneath the slats. Then, the parts of the slats overlap the other part of the top that they aren’t screwed down to, and they can be pulled apart. This is how the pull out top functions.
Fastening The Slats

Rounded edges on the slats
After determining the width of my bed at 25″, I can start doing the layout for the slats. The slats will be less than 25″, just as long as they overlap the edges of the boards beneath them by a few inches.

Laying out the slats and getting the spacing right

Drilling pilot holes, fastening the slats
I used drywall screws to attach the slats to the boards below. I recommend adding a flat washer in between the slat and board beneath for just a little extra clearance, this really helps them pull apart smoothly. I didn’t do this now, and had to remove each slat one by one later on to add washers. I also recommend drilling pilot holes to avoid any cracking when drilling in the drywall screws.

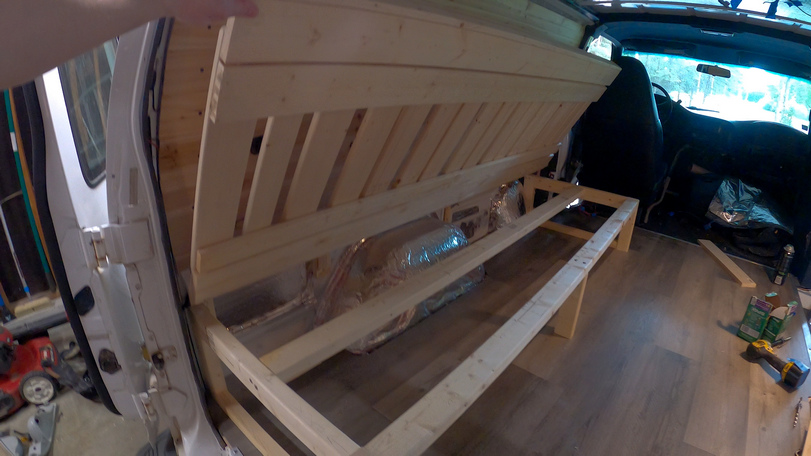
The top sliding piece of the bed is complete
Here the bed top is complete. From this angle, it should be easier to see and understand how the bed top is constructed. If I pull up on the piece that’s in my hand, the horizontal board, second from the bottom, will move up with it, along with the slats that are connecting the boards. The bottom board and the second from the top board will not move, they are fixed in place. Make sense? I hope so. The bed build is a little complicated at first, but it starts to make sense as you get into the project.
Building The Frame

I’ll build two of these rectangular frames, one for each end of the bed frame

One of these on each end of the frame…

Fasten the frame to the floor
Next I’ll build the frame that the sliding bed top sits on top of. 2×3 boards work great for most of this. I’m using spax construction screws to fasten them. Pocket Screws can also be useful here. Really, you just need the pocket screw bit, and you can use spax screws in the pocket screw hole you just drilled, if needed.

The bed frame

2×3 boards for most of this
The bed frame is basically made of two rectangular frames for the end pieces with two 2×3 boards spanning the distance between them.
Attaching The Bed To The Wall

The block of oak allows me to use longer screws for the hinges, to make it more sturdy and solid
Here’s how the bed flips up on the hinges
I attached hinges to both the bed support beam on the wall and the top bed piece. I used a block of oak to increase the thickness of the board that the hinges are screwing into on the bed top piece. This allowed me to sure longer screws and make sure it’s solid. The top piece sits on the bed frame below, supporting it, so there isn’t much/any pressure on the hinges. The hinges are a nice addition because it allows me to lift the top of the bed to access storage underneath.
Adding The Legs

Rounded edges for the legs. Also, I’ll add felt to the bottom of the legs

Make sure to reinforce the legs with metal L brackets
I used 2×3 boards for the legs supporting the top sliding piece. These legs do nothing when the bed is in sofa mode, but they support the end of the bed when it’s pulled out. So, make sure they’re strong. I sued metal L brackets to add some rigidity to the legs. If you are debating whether or not it’s worth the effort to add these, let me tell you, it is 100%. They cost pennies and will go a long way to ensure your legs don’t get bent and crooked from repeatedly pulling out the bed and/or accidentally kicking it, for example.
I also rounded off the edges of the legs on the belt sander. I want the edges of all wood in the van to be rounded and smooth. Sharp edges end up splintering and can be abrasive to skin that rubs against it. Smooth edges it is.
Adjusting Slat Tension

Good thing I bought the 100 pack…

68 screws to take out, 68 washers to add, and 68 screws to screw back in…
As I mentioned earlier, I had to add washers in between the slats and board below them. The bed would pull out, but I really had to force it. Adding washers solved that issue, and gave me the clearance necessary for it to function smoothly. But, I had to remove every screw holding down the slats. I believe that was 68 screws! Make sure you get the 100 pack of washers.

The pull out slat bed build is complete
With the washers in place between the slats and board below, the pull out bed is smooth. The bed is also now complete!
Cutting A Foam Mattress

I’ll need to cut the overlap

This poultry knife works great for cutting foam

Like butter!

The mattress is in and the 3 cushions have been cut
Next, I’ll “build” my mattress. I bought a 5″ thick foam mattress from the Foam Factory, for $83 shipped. Not bad. It comes in a length of 75″, which is exactly what I need. Now, I need to trim the width to size. The mattress comes in 39″ width, and I’ll cut it to 37 inches. Then, I’ll cut that piece into two pieces; 25″ for the mattress, and 12″ for the cushions.
I used this electric poultry cutting knife to cut the foam, as recommended by “the internet”. The electric knife works very well, but it can be hard to cut a straight line sometimes. No matter, it doesn’t need to be perfect, the edges are hidden inside the bed sheets at the end of the day. Finally, I’ll cut the 12″ piece into thirds, and make three separate cushions.
Making A Custom Fit Mattress Cover Sheet
Unfortunately, I don’t have any photos or video of the sheets making process, just the finished result. But, it’s pretty simple.

The fitted mattress cover I made out of a twin bed sheet
I bought a cheap pair of bed sheets for a twin bed, and used the sheet to wrap around my foam mattress. Once I determined where the stitching should go, I used a sewing machine to stitch the sheets together and form a big “pillow case” for the mattress to just slide into. I sew up one end, and the other end stays open. With the mattress inside the cover, I fold over the excess sheet and use safety pins to keep it together.

I use safety pins to keep the pillow cases tightly on over the cushions
For the cushions, I just used the pillow cases that came with the bed sheet set I bought. The pillow cases were a near perfect fit for the cushions, and I used safety pins here too to keep them on tightly.

The pull out bed in action
That’s it, I now have a pull out slat bed that folds up! The mattress is super comfy, I sleep better on it than my own bed.
Previous Van Build Post: 6 – Cedar Plank Ceiling Installation | DIY Stealth Camper Van Build Index | Next Van Build Post: 8 – Lithium Battery


Thank you for posting the bed design and instructions! That is a great design and the instructions, pictures and video are very helpful.
Anything you would change on second one?
August 22, 2023 at 12:13 pm
Thank you, Mark! Honestly, I am pretty happy with the bed as-is. Nothing has broken or failed on it so far, and I sleep great on the 5″ foam mattress. I rarely pull it out or flip it up, but it’s useful when needed. One thing though… the 12v outlet on the wall, at the head of the bed… With a USB charging adapter and cord plugged in, it sticks out near where my head is when sleeping. It would have been better placed in the cubby hole, out of the way. Anyhow, good luck with your build!
August 24, 2023 at 2:21 am
hi! we followed your build really closely and it was super helpful. one main question i had is why you have the second lengthwise 2×3 as part of the frame (the one that isn’t connecting the sides on the end). as of right now, that’s not part of our build and i’m wondering if i’m missing something big or structurally important by not having it. it seems like the one side and the other that’s attached to the wall would suffice for support but i’d love any insight into potential blind spots. this is my first time building anything so i have no ego about it or reason we didn’t include it other than it didn’t seem totally necessary as we were going along but we set off on monday and im trying to quell some of my anxieties about potential problems. thank you!!
August 23, 2025 at 12:13 am