Chevy Astro Camper Van Build: Power Center
Chevy Astro Camper Van Build Phase 11: Power Center
Tools & Materials
Materials:
100a Lithium Battery
Battery Monitor
Renogy 12V 50A DC-DC MPPT Charger
Blue Sea Systems Battery Shut-Off Switch
Blue Sea Systems 12v Outlet
Blue Sea Systems 2-Socket Panel
Blue Sea Systems 60a Circuit Breaker
Blue Sea Systems 70a Circuit Breaker
Blue Sea Systems Toggle Circuit Breakers, 20a & 80a
Blue Sea Systems Terminal Fuse, 150a
Blue Sea Systems MRBF Terminal Mount Fuse Block
Blue Sea Systems Fuse Panel
Blue Sea Systems 250a Bus Bar (2)
20ft 4 AWG Flexible Welding Wire
100a Mini ANL Fuse Holder
12-10 AWG Ring Terminals 1/4″
12-10 AWG Ring Terminals 3/8″
4 AWG Copper Ring Terminals 3/8”
4 AWG Copper Ring Terminals 5/16”
12v LED Light, Flush Mount
12v DC Dimmer Switch
Dimmer Switch For LED Puck Lights
Spax Construction Screws
5/16″ Grommets
Heat Shrink Butt Connectors
Wire Crimp Connectors Kit
Spade Fork Terminal Connectors Kit
Tools:
Dewalt Cordless Impact Driver
1/4″ Drive Quick Release Bit Extension
Dewalt Oscillating Tool
Craftsman 3/8 Drive Drill
Craftsman Socket Set
Dewalt Compound Miter Saw
C Clamps
Heavy Duty Wire Lug Crimpers, 10-0 Gauge
Heat Gun
Wire Stripper/Crimper
Klein Tools Cable Cutters
Step Bit
Speed Square
Video – Chevy Astro Camper Van Build: Power Center
Project Overview: Power Center
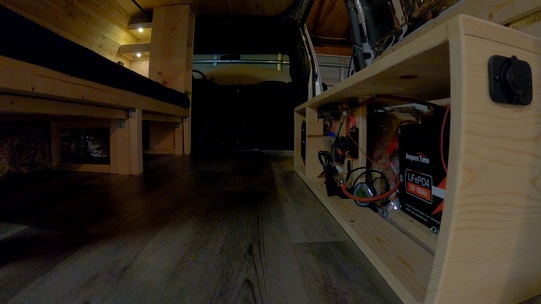
The Power Center is the enclosure I’ll build to house all of the major electrical components. All of the van’s wiring will be routed here. The major components are the DC Charger, Lithium Battery, DC Fuse Panel, Circuit Breakers, Bus Bars and a master shut off switch. The power center will have two toggle switch circuit breakers, to turn on/off charging via solar and alternator. There will also be 5 12v outlets installed in the power center.
I’ll need to figure out the most space-efficient way to mount the electrical components. Much trial and error is needed to visualize the optimal layout and design. I originally wanted to include a 1000w inverter, but I couldn’t find a good place to mount it, and decided against it. I ultimately chose to buy a 500w inverter, the kind that’s portable and not permanently mounted. Long term, I am happy with this decision.
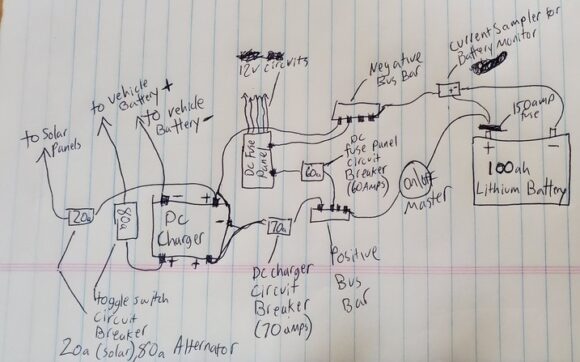
I busted out the crayons and drew this diagram of my electrical wiring to help visualize what’s going on. Once you settle on your major components, it’s time to go shopping. Home Depot doesn’t carry practically any of this stuff, but it’s there on Amazon.
Power Center Layout & Design
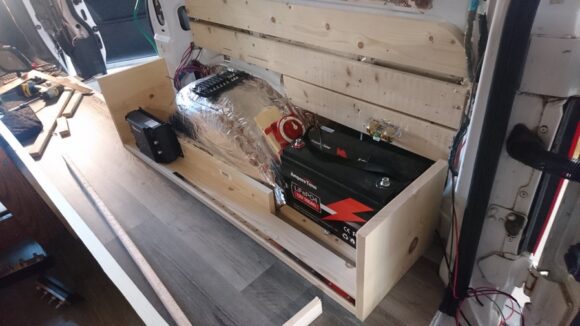
The first step is to layout all of the components and see how much space they will take up. Things to consider: packing the components into a small a space as possible, keep wires as short as possible, and access to components like circuit breakers. The design of this box takes a lot of thought. What is the best way to utilize this space, given the awkward size and shape of the wheel well? How can I mount these components so that they are protected and out of the way, but also accessible for maintenance?
To start, I lay out my lithium battery, dc charger, fuse panel, circuit breakers, bus bars and a 1000w inverter. I toy with a design that places all of these components on the back wall, and building shelves out over this. Mainly, it’s the big inverter that takes up the largest and most inefficient use of space. I begin to seriously question how much I need the inverter, and ultimately give up on it. Instead, I decide to buy a 500w inverter that’s portable. I can plug it in via 12v DC or direct to the battery with little jumper cables. It takes up less than half the space as the Renogy 1000w Inverter, and I come up with a great storage spot for it later on.
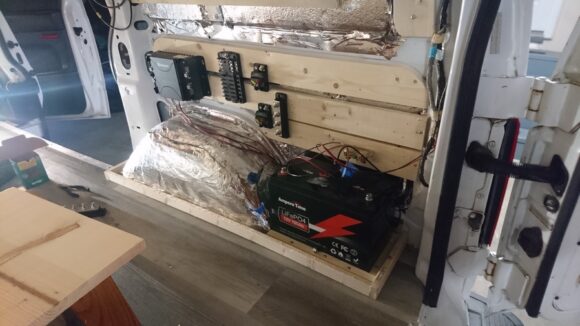
Visualizing the layout of the box. Those components will be mounted no higher than the battery, in an enclosure around the wheel well
Next, I start thinking about a design that has all of the electrical components inside one large “box” that fits around the wheel well. I use some 1×2 boards to visualize the size of the enclosure. I am starting to like this design.
I begin cutting 10″ pine board and make two side pieces, and use a scrap piece to simulate what the front would look like. Yup, this is going to be my design for the power center.
Building the Enclosure
I start framing out the box with the side pieces connected by a board on the floor, cut to fit in front of the wheel well. I’m using select pine board from Home Depot. I’m using the boards I’m using for the largest faces of the enclosure are 1×10 select pine boards from Home Depot. For other parts of the box, I’ll use 1×6, 1×4, etc. I’m using spax construction screws to fasten these boards. Cabinet screws are also a good choice, as they have a flatter head, pulling the boards together tightly without the screw head cutting into the board itself. The downside is that the heads of the screws may stick out a little more than the regular construction screws.
Next, I’ll use metal brackets to join two boards together, creating one board, that will become the mounting board for my DC Charger. This mounting board will sit against the wheel well, and will be recessed in from the front face of the power center enclosure. This will allow the DC Charger to sit flush with the front of the power center when it’s mounted.
Mounting the DC Charger
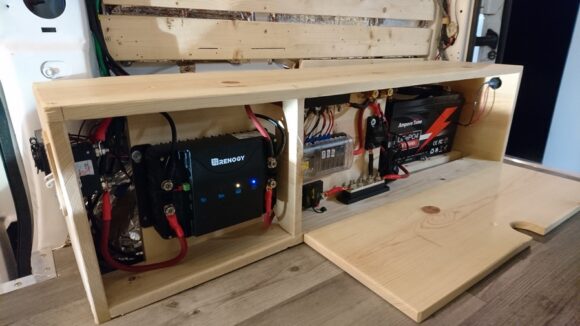
The DC Charger needs to be visible, because it has LED lights that tell me if it’s on, working properly, and charging my lithium battery or not. But, I want it to be out of the way as much as possible. There are also several 4 gauge wires that need to be routed to and from it. I decide to build a little box around it, essentially, but leave the front open. The cables can pass through on the sides. I prop up the DC Charger with some boards and screw it to the pine board with some spax screws. That’s it for now, until I make some cables to connect it.
Electrical Components Layout
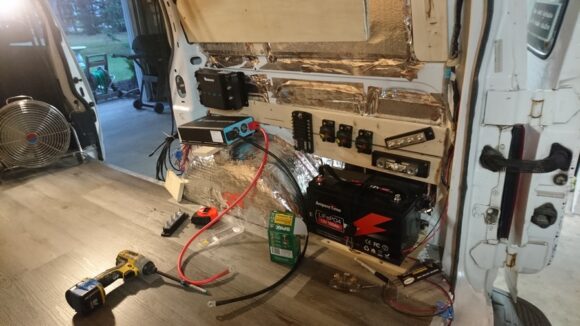
More layout issues. I’ve made the box with a general idea of where the electrical components will go, but now it’s time to do the actual trial and error work of laying them all out in my available space. It helps to visualize the flow of power, from the lithium battery, through the main shut off switch, to the bus bars, the circuit breaks, and to the main components (DC Charger, DC fuse panel). Then you can see which component needs to be placed first inline, and how long the wire connecting one component to the next will roughly need to be.
Once I’ve fine tuned the layout, I start screwing down the bus bars and circuit breakers. In the bottom photo, you can see a hole I drilled through the pine board in the center of the Power Center. This will be used to route wires from the rear of the enclosure to the front. All of my 12v circuit wiring will come in through this one hole, making for a clean installation. Try to be conscious about doing a clean and tidy installation. You don’t want a rat’s nest of random wires tangled up in your power center. When you have problems later on that need to be troubleshooted, or when you want to add to or modify your electrical setup, you will thank yourself when the wiring is ran in a clean, efficient manner.
Installing the Battery Monitor Current Sampler
Next, I’ll install the battery monitor’s current sampler. This thing is exactly what it sounds like: it samples the current, and sends it to the battery monitor. The two big lugs on top are for the for the negative cable coming directly off the battery. The actual current is measured by a smaller gauge positive wire. The ring terminal goes on the battery, before/after the fuse. I’m using a Blue Sea Systems MRBF Terminal Mount Fuse Block with a 150a Terminal Fuse.
Making Cables & Connecting Electrical Components
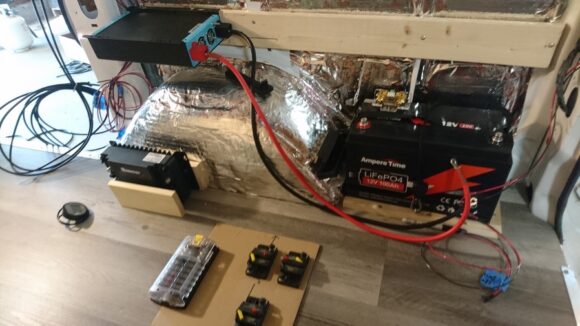
Next I’ll start on making cables to connect my electrical components together. I’m using 4 gauge flexible welding wire for most of these cables. This wire has an amp rating of 100-150 amps, far more than I’ll need for any single component in my setup. You’ll need Heavy Duty Wire Lug Crimpers, a Heat Gun, razor blade, and Cable Cutters for this next part. You’ll also need 4 AWG Copper Ring Terminals and heat shrink tubing (if this doesn’t come with your ring terminals already).
First I’ll start by making the cable that connects the positive terminal of the battery to the input side of my master ON/OFF switch. I’ll use a razor to cut off about 3/8″ of the insulation from the end of my 4 gauge welding wire. Next, I’ll slide a piece of heat shrink tubing over the wire. Then, I’ll place a 4 gauge copper ring terminal over the end of the exposed part of the wire, and crimp this down using the heavy duty lug crimpers. This tool is absolutely necessary to get a good connection and crimp. Don’t think you will get by using a pair of pliers or something, it’s not going to cut it here! Then, slide the heat shrink tubing over the ring terminal, and use your heat gun to put the shrink on that heat shrink tubing. This provides further protection from the elements and anything touching the exposed part of the wire that may or may not be covered up by the entirety of the ring terminal. Plus, it makes your install look really clean and professional.
Next I’ll cut the cable to length, and put another ring terminal on the other side of the wire.
Some of the terminals in your setup may be 3/8″ and some may be 5/16″. You may need one or the other, or both, of the ring terminal sizes throughout your setup, so be aware of that. They don’t sell this stuff at Home Depot or Auto Zone, so you need to plan ahead and order these things from Amazon, unless you have some excellent local electrical supply store or something.
Above, you can see the wiring coming together now in the power center. You can also see that you need to consider the angle at which you crimp on your ring terminals, especially on such short runs of cable. The two ends might be facing totally different directions, so ALWAYS crimp one end on at a time, and recheck the position of the other end before crimping that one.
Install Toggle Switch Circuit Breakers
Next I cut the hole in the side of the power center for my toggle switch circuit breakers. I’m using a Dewalt Oscillating Tool for this, the perfect tool for the job. I highly recommend buying one for your van build, if you don’t own one already. There will be multiple instances where this tool comes in handy. It allows you to cut very straight and precise cuts in tight environments. There are multiple attachments and uses, but just for it’s unique cutting abilities, I use it all the time. It makes quick work of cutting a hole for the toggle switches to sit in.
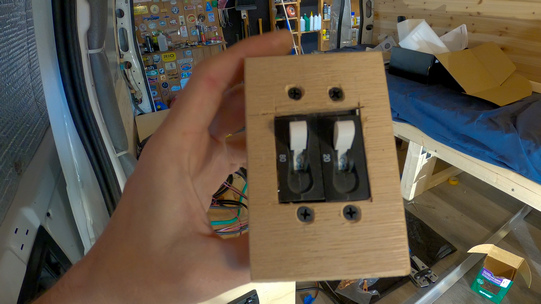
These are circuit breakers that are meant to be used like toggle switches. The 20 amp switch will be the master ON/OFF switch for solar charging, and the 80 amp switch will be the master ON/OFF switch for alternator charging. I made a mounting plate for the switches out of some scrap wood. It’s not the prettiest, but it works. And, it looks better from afar!
The switches slide right into the hole, a great fit. On the backside, I’ll connect the cables to the correct switch. Coming into the 20a switch from the ceiling, I’ll attach the 10 gauge cables coming from my solar panels. I’ll use a 4 gauge cable (out of convenience, because I have so much of it) connecting the 20a switch to the DC charger. Coming in from the ceiling, from the vehicle’s battery under the hood, I connect the 4 gauge wire from the battery for alternator charging to the 80a switch. I’ll use 4 gauge wire to connect the 80a switch to the DC charger.
Install 12v Outlets in Power Center Enclosure
I added some 12v outlets to the sides of my power center. You can separate yours into however many circuits as you’d like. The Blue Sea Systems 2-Socket Panel comes with the necessary wiring to wire two outlets together like this, but the Blue Sea Systems 12v Outlet are sold separately.
Connect 12v Circuits to DC Fuse Panel
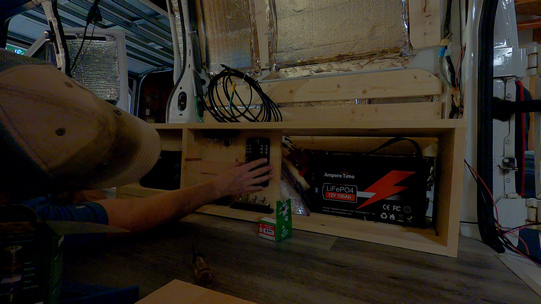
That hole I drilled through the pine board earlier? Now it’s time to run all of my 12v circuit wires through it. This hole not only provides a way to pass the wires from the front of the back of the enclosure to the front, but also to route them cleanly through on location. The terminals are just below the hole, so it’s a short run and most of the wires sit behind the power center, out of sight. The 12v circuit wires are all 14 gauge, so I use Spade Fork Terminal Connectors for 14 gauge wire. I crimp on the appropriate size spade fork and make the connection to the terminals on the fuse panel. Easy. Also, don’t forget to label your circuits on your fuse panel. The fuse panel should come with stickers for this… use them!
Choosing The Right Size Fuses For DC Fuse Panel
My fuse panel uses the standard sized fuses, and like many people, I already had a drawer full of these amongst my automotive stuff. Fuses are kind of pricey to buy from AutoZone and such, but pretty cheap on Amazon. There’s always your local pick n pull junkyard, too.
It will be up to you to choose the correct size fuse for your 12v circuits. How do you do that? Well, think about how many amps your end appliance will draw. For example, my LED puck lights. I have four 3W lights, for a total of 12w. These lights will draw less than an amp when on with dimmer set to 100%. You want to choose a fuse that is rated for more amps than you will be using, but the smallest amount over what you’ll be using at the same time. For example, a 15 amp fuse is way to high for my LED puck lights. Why? Because if there’s a short in the circuitry and 15 amps are pushed through the circuit, that much juice may damage the LED puck lights, and could melt the thin wires coming off the LED lights. Instead, a better choice for a fuse would be something like 2 amps. That’s much less likely to fry the LED lights or the wires if too many amps slip through.
Now, for something like an outlet, you don’t know how many amps are going to be drawn. That’s up to the appliance you plug in. So here, you should consider the wire you are using in your circuitry. I’m using 14 gauge wire, which is rated for 15 amps. So I’ll use a 15 amp fuse.
Making a Magnetized Access Door For The Power Center Enclosure
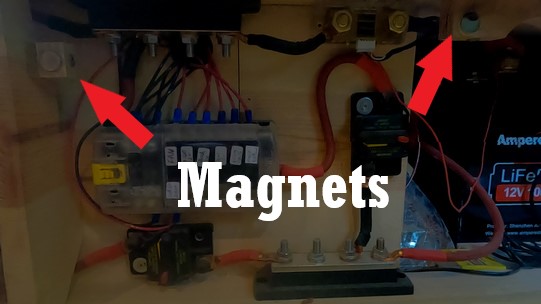
I made a door for the power center that is attached to the enclosure via a hinge on the bottom. I cut out a circle near the top to grab when opening the door. Behind the door, I attached a few blocks of wood to act as stoppers for the door, so it sits flush when placed against the stoppers. Also, I attached magnets to the outer facing edges of the wood stopper blocks. These magnets will contact plates of metal on the inside of the power center’s door when closed. A couple of these magnets together is strong enough to keep the door in place on even the roughest of dirt roads.
Installing the Battery Monitor
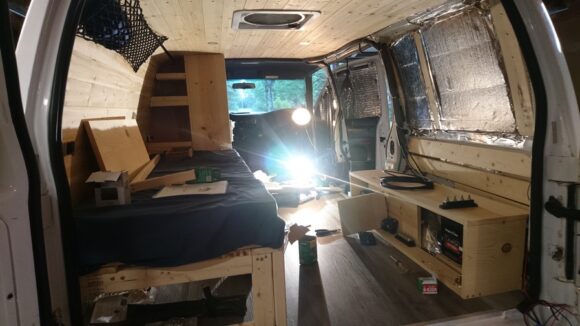
The battery monitor is technically installed in the next phase, after I’ve built the shelving. But since it it directly related to the power center, I’ll include it here. I cut a hole in my shelving, next to m dimmer switch for the LED puck lights near the side of the van, and install the battery monitor. I’m using the AiLi Battery Monitor, which has a reputation of being a good bang-for-your-buck battery monitor. This essentially connects to the battery monitor’s current sampler, that I installed earlier. One thing to note about this monitor is that whenever power is being drawn from, or charging to, the battery, the green backlight will illuminate on the screen. This is very annoying at night, as it lights up the entire van. You’ll want some way to cover this up at night.
Previous Van Build Project: 10 – Electrical Wiring | DIY Stealth Camper Van Build Index | Next Van Build Project: 12 – Shelving & Storage

















Leave a Reply